Macarons are hard. Seriously. They are incredibly finicky and if you mess up one little step, they lose the incredible charm that is associated with this little french cookie. When Rina told me that she wanted a french themed tea party about a month ago, I was so excited! I have always loved French macarons, but they were often too pricey for me to just buy and gorge on. A few years back, I had purchased a dozen macarons from Little White House from Fort Langley and I have been in a love affair with them since. It’s a shame that they cost $18 for the dozen. (Still totally worth it!)
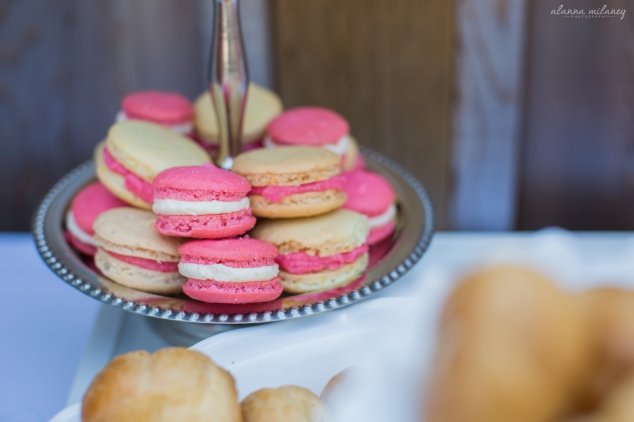
So I naturally jumped at the chance to make them. Although you see a beautiful photo of some successful macarons (courtesy of Alanna Milaney Photography), my initial journey was anything but perfect.

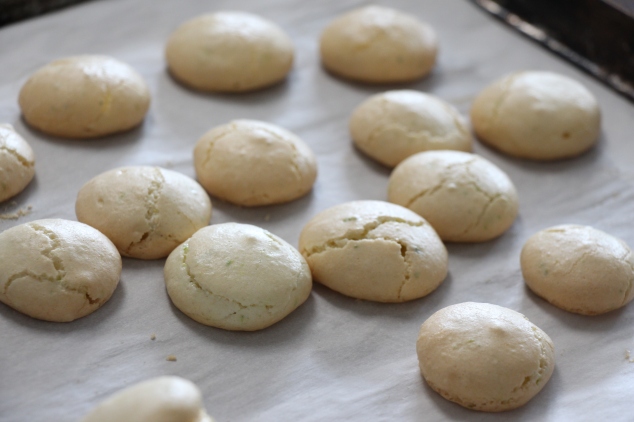
Those beautiful pink and white macarons are a result of 4-6 trial attempts to get them right. I found that all recipes for macarons are slightly different and there are some recipes that leave out steps and some that add unnecessary steps. To give you an accurate portrayal of my first attempt, here is something I’m a bit ashamed of.
It’s not pretty. And here’s ugly attempt number 2.
Attempts number 3 didn’t even make the camera cut. That’s how bad they were. Sure, they tasted delicious, but the texture was wrong and ended up being incredibly hollow and too fragile to actually fill without destroying.
I was at my wit’s end and I really didn’t want to call up Rina to tell her that there was no way I was going to make macarons. But something inside me pushed me to make a 4th practice batch and…
They were tolerable. Not perfect, but they looked good. Good enough for them to look presentable at a friend’s going away party. So I filled them with a nice ganache and kept them in the freezer. Just before the party, I take them out of the freezer to take some photos and the terrible happens.
The entire batch plummets down to the ground. There isn’t a single salvageable one.
The one in the photo was the best looking one of the bunch, post drop. I was so upset that my husband had to usher me out of the kitchen to clean up the mess. Apparently, I was swearing so loud and badly that I was teaching toddlers new words in a 3 block radius.
So when I finally made the right batch at my friend’s house, I was ready. I was seasoned and I knew what I was doing.
One thing that is imperative to making macarons is properly whipping your egg whites.
Seriously.
If you just toss them in the mixer on high and disappear for a bit, you are doing it wrong. Go and Google how to properly whip egg whites to stiff peaks.
This youtube tutorial is really good at demonstrating how to whip them properly. The important part (whipping with sugar) is closer to the end of the video. If you over beat the egg whites, the shells come out hollow. I also found that leaving egg whites out over night on the counter worked really well. Or even better yet, a carton of egg whites! Then I don’t end up wasting egg yolks and I can pour the precise amount of egg whites I need.
I was able to pull off some spectacular macarons. Not only did they look good, they tasted amazing!
I made White Chocolate Macarons (pink shells), with the same white chocolate butter cream that was featured in the ombre cake. The others are Citrus Raspberry Macarons (white shells) with an amazingly fresh raspberry butter cream! I know that macarons are usually filled with jams or ganaches, but I found that ganaches tend to not hold their shape. While the cookie is being assembled, the shells slip and they don’t look as nice (personal experience). I prefer using butter creams because they are easier to flavor and leftovers are easily remedied by tossing them in the freezer. They hold their shape at most temperatures and I can easily sandwich more filling in them.

Again, if I haven’t said it enough, check out Rina’s blog, And She Dressed for hosting such an awesome tea party! Her posts can be found here, here and here!
Also a huge round of applause for Alanna Milaney Photography for all the tea party photos and the amazing food pictures she has taken! Her post can be found here!
Remember to check out the Novice Gardener for her Fiesta Friday #30 post that features yours truly! If you want to find some amazing food blogs, this is the place! Check out the blog party every Friday for some amazing recipes!
Last but not least, my first giveaway has just concluded and via Rafflecopter, it has randomly chosen one lucky winner! Congratulations to Katrina L! I will contact you via PM to send you your Rain or Shine Giftcard!
French Macarons
Adapted from How to cook that!
It is best to have an accurate kitchen scale for this. I prefer to be precise in my measuring of ingredients since macarons can be so finicky. This isn’t for the faint of heart, but at the same time, don’t let my failures dissuade you. They can be frustrating when they don’t turn out, but when you get that perfect batch, it is absolutely magical.
Things to prep before starting.
1. Parchment paper for several baking sheets. Make sure the paper is cut to size. Don’t fold the edges and tuck them under, it will warp the shape of the shells. If you want to draw little circles on the paper, this is the time to do so, just make sure the side you draw on is facing down on the sheet.
2. Prep your piping bag with the appropriate tip. Your piping tip should be a large round tip.
3. Have plenty of counter space ready to let the shells rest. Hopefully this area is well ventilated.
Macaron Shells
140 grams of room temperature egg whites (approximately 4 large)
70 grams of granulated sugar
230 grams of icing sugar
120 grams of ground almonds (aka almond meal/almond flour/almond meal)
pinch of salt
gel food coloring (if using)
zest of an orange/lemon/lime (optional)
Place egg whites in a stand up mixer and mix until foamy. Add the granulated sugar and slowly whip the egg whites to stiff peaks. I did this slowly and carefully because once you over mix the egg whites, you have to toss it out and start all over again. They should be smooth and shiny at the end. If you are adding color to the shells, this is a good time to add it.
Sift the almond flour, icing sugar and salt together. I was far too lazy, so I tossed them both in a food processor and whizzed them together. If you are adding citrus zest, this is a good place to add it in. The important thing is to make sure that all the ingredients are well incorporated. The sifting is to get rid of the odd large almond pieces, but I found that the almond flour I bought from Costco was too coarse for sifting, so I skipped the sifting step. I didn’t think it affected the texture too much.
Using a large spatula, carefully fold the almond mixture into the egg whites. You should be folding approximately 30-50 times. If you under mix the batter, the shells will crack; if you over mix the batter, the shells will spread and feet will not form. It should be smooth, viscous and NOT RUNNY. It should flow around the bowl like slow moving lava. In general, it is better to undermix than it is to overmix.
When mixed, spoon the batter in the piping bag and pipe them onto the cookie sheets (about half an inch to an inch apart depending on the size of the macaron) that have already been lined with parchment paper. I pipe approximately 1 teaspoon of batter. This will take several cookie sheets.
Carefully take a baking sheet in your hand and rap it against the counter. This will cause the batter to spread out a bit and settle. It will normally get rid of the “nipple” from the piping tip and help form its shape. They say this also prevents cracking, but I’m not too sure about this.
Let the macarons rest in a ventilated area for at least an hour. DO NOT SKIP THIS STEP! If it is raining and humid out, then let them rest even longer (I think mine were resting for about 2-4 hours). By letting the macarons rest, it will form a skin over the batter and help create the little feet on the bottom and hopefully prevent cracking. To see if it is ready, with clean dry hands, you should be able to touch the top of the shells without any stickiness. Use this time to make the butter cream.
When you feel the macarons are ready for the oven, turn the oven on to 300 degrees and wait until it reaches temperature (yet another excuse to give the shells as much time to rest as possible).
Bake one cookie sheet at a time in the middle rack. Bake for approximately 18 minutes (rotating the pan at the 9 minute mark).
Let cool on the cookie sheet and carefully peel them off the parchment paper when they are cool.
When all the shells are baked, pair up the shells by size and arrange them so they are ready to be filled with a filling of your choice.
Fresh Raspberry Butter Cream
From My best friend’s arsenal (Thank You for letting me share it with the world KVD!)
3/4 cup of butter
2 cups of powdered sugar
1 cup of fresh raspberries (defrosted from frozen might work as well. Someone try this and let me know how it turns out!)
1/2 teaspoon of vanilla extract
In a food processor/blender, puree the raspberries and pass them through a sieve to eliminate the seeds. Put the puree aside.
In a mixer, beat the butter and half the sugar until it is smooth. Pour in the puree and vanilla. It will look a little chunky, but don’t worry. It will still taste amazing, I assure you. When it looks fully incorporated, add the rest of the icing sugar. Beat until smooth.
Assembling the macarons
Your cookie sheets should have the shells arranged by size in pairs. Spoon the butter cream in the piping bag and pipe them onto the shell. Be creative. You don’t have to use a round tip to pipe the filling. I used a star tip and it gave the edge of the macaron a little flair.
Carefully sandwich the shells together and place them in the freezer in an air tight container. They will keep in the freezer for about a month, if they last that long.


Macaroons are my absolute favorite! I need to give these a try, but I’m a little intimidated 🙂
LikeLike
Just go for it! When they turn out amazing, it is such a feeling of accomplishment.
LikeLiked by 1 person
These look like you bought them at the bakery! Beautiful. I don’t think I am going to try mastering them. It wouldn’t do my self esteem any good. 🙂
LikeLike
No!!! Don’t say that! It’s all about trying new things and pushing your boundaries! They will be so much sweeter when they do come out!
LikeLike
Beautiful and very elegant! Thanks for bringing all this beauty at FF!
LikeLike
You are welcome! 😀
LikeLike
BEAUTIFUL!! I have made them once and luckily had success. 🙂 SO MUCH work!! I am not sure it will ever happen again- aren’t you glad that you have this post to document your success? You should be!! 🙂 Happy FF!
LikeLike
That’s amazing! Good for you on your first try too! I think it would be a travesty if you never make macarons again.
LikeLike
Well done! Macaroons baking is so demanding. I only make some for great occasions. Yours look really beautiful !
LikeLiked by 1 person
Thanks! I love your snickers macarons. I would be lying if I said I didn’t think about attempting those.
LikeLiked by 1 person
They look sooo pretty! Thanks for sharing
LikeLiked by 1 person
Thanks!
LikeLike
Just gorgeous and I admire your perseverance in perfecting macarons!
LikeLike
If at first we don’t succeed… 😀
LikeLike
wow wonderful recipe…i will definitely give them a try…thanx for sharing with us…Happy FF
LikeLike
I hope you do! I’ll look forward to seeing how yours turn out!
LikeLike
stunning! you could rival a paris bakery!
LikeLike
Ha ha ha! Thanks!
LikeLike
credit where credit is due!
LikeLiked by 1 person
I love your post. Honest and beautiful!
I’m so impressed that you didn’t give up until you got the perfect result. They really look wonderful. I never tried macaroons and being vegan I don’t think I’ll ever manage to replace four egg whites (whatever egg replacer I’d use). But I’m willing to stay optimistic that one day a clever baker will do it for me! Here’s to you staying optimistic too!
Happy FF.
LikeLiked by 1 person
Thanks for the useful tips on making macarons. I have had ‘beginners’ luck’ so far, but often it is when I am super confident I risk the greatest failures, so these tips are worth bearing in mind. Beautiful photos too. I love that deep ping container.
LikeLiked by 1 person
These look great! I’ve only made macarons a couple of times, and I’m pretty sure I’ve taught myself new swear words during the process (and that’s saying something, I curse like a sailor haha). The problem is I’m not a big fan of macarons so I don’t have much motivation to make them, but every now and then I get roped into it! I’m glad you managed to master it, your photos are beautiful! Hopefully the next time you’ll be an expert and be able to make them with your eyes closed!
LikeLike