
So last week has been a little hectic for me. I had to make super rushed trip back home to see my husband back home and as soon as I got there, we had to make a long roadtrip to Southern Central BC for a family reunion.
We love road trips. We do them often, and friends and family are always worth it. The only problem is that for a 12 hour road trip, we end up eating terribly. Along the way, it’s usually McDonalds, Tim Hortons or gas station snacks. So if we are going to be eating badly, we might as well make it worth it, right?
So naturally, I made Cheese buns!

Cheese buns are great because they are relatively quick and easy to make. They are especially great for road trips because there isn’t always a place to stop for food when we are on the road. They are like mini sandwiches that taste way better. They are handy to eat while driving, which you should never do, and they are easily packable.
Bonus, they clear out the cheese from your fridge before leaving for vacation!

I only wish this recipe made more than just 16 small pieces. Each bun ended up being around the size of a child’s fist. They are also incredibly versatile, so I can throw in whatever cheese or meats in them! I ended up folding little bits of ham in them (I only had 2 slices left).
Plus we had to use up an insane amount of cheese to use up. We were gone for over a week and we didn’t want to risk leaving cheese at home gathering mold.

These little buns were so ideal on the drive! We ended up devouring all of them in the 12 hour drive and we didn’t have to waste too much money on McDonalds, Tim Hortons or gas station beef jerky. I highly recommend it for packing lunches or making slightly bigger ones for burgers.
Fridge Clearing Cheese Buns
Adapted from PhenomenalPhoods
1 cup of warm water
2 teaspoons of honey (or any other sugar. Don’t be limited to basic white sugar)
1 packet of quick rise yeast (2 1/4 teaspoons, I believe)
2 teaspoons of salt
2 cups of grated cheese (I used Cheddar and some Parmesan. Feel free to use which ever sharp and delicious cheeses you like and let me know how they turn out)
1/4 cup of olive oil
many grinds of fresh black pepper
2 1/4 cups of flour
16 cubes of sharp cheddar (approximately 2 cms by 2 cms)*
Combine water, honey and yeast in the bowl of your stand mixer and let it stand for about 5-10 minutes, until foamy.
Add salt and olive oil and then slowly mix the flour in with a dough hook. Add half the cheese and a couple of grinds of black pepper with the dough.
Put the dough in a well oiled bowl and cover. Leave it in a warm draft free area for about an hour (until it doubles in size).
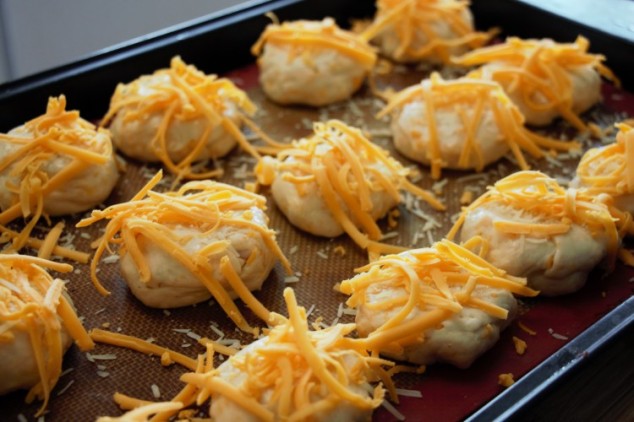
Divide the dough roughly into 16 equal pieces. Place a cube of cheese into each piece, pinch the dough around it and place it on a baking sheet.
Let the buns rise a second time for about 30 minutes.
Turn on the oven to 375 degrees Fahrenheit.
Sprinkle the remainder of the cheese on top of the buns along with some fresh grinds of pepper.
Bake for 15-17 minutes, until golden brown and bubbling.
*Feel free to add some caramelized onions, ham, roasted garlic or roasted peppers. It would be soooo delicious!

Yes please!
LikeLiked by 1 person
These look and sound wonderful! I may be in love with them 🙂
LikeLiked by 1 person
I love the idea of taking these on a road trip and not having to make emergency stops at second rate eateries on the highway. And of cleaning out your fridge before you go. But then again, I think I would like these even if I’m not planning to do either of these things. Thanks for sharing.
LikeLiked by 1 person
I would enjoy eating these for any occasion 🙂
LikeLiked by 1 person
looks and sounds amazing… !!
LikeLiked by 1 person